Academy Cloud Architecture – Module 11

Multi-region fail over with Amazon Route 53

aws_route53Last lab for the ACA certificate, so hopefully its a good one! Today’s blog is about Route 53, so what does route 53 do? in the simplest form, It is used to have a infrastructure available over entire regions! So it is very similar too a load balance, but at one layer higher.

For this lab, we will be using a health checker to watch the status of the regions and if one goes down, switch it over to the other region.

Time to Complete: 3 Hours
Lab Cost: 10 Credits
Version: A5L5

Inspect the environment

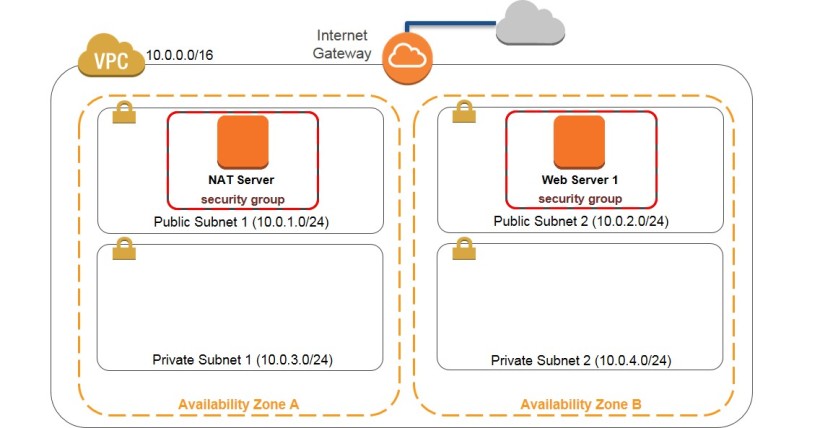
First off, we should document the infrastructure of the system and what regions we are using. It is quite a simple structure as the point of this lab is cross region, not the structure itself.

Region One: US East ( N.Virginia)
Instances: Web-Application-1 (3.213.148.118)

Region One: US West(Oregon)
Instances: Web-Application-2 (54.187.216.59)

Configure a health check

Now to set up a health checker to watch Web-Application-1. We can make this from within Route 53 services. The health checker I have set up is called “check-1” and it is watching the IP Address 3.213.148.118, which is Web-Application-1.3 - Creating health check.PNG

Configure your domain

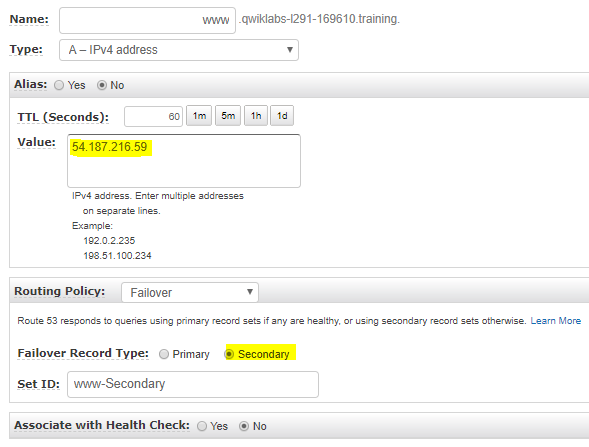
Now within the domain name we are using, I am creating a thing called a record set. Basically, a record set is a way a domain can flow traffic and how it does it. The first record I am setting is for Web-Application-1 and set it up to have a policy of being the Primary Fail over and connect it to the health checker, that was just created.

Domain.PNG

The next record set is for the Web-Application-2 and it follows the same routing policy, however it is set to Secondary, So that whenever the primary fails, the domain knows where to send traffic to and in this case, its 54.187.216.59.

5 - sec doomain.PNG

Check the DNS

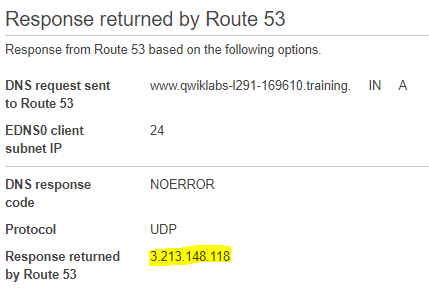
Now lets see what is the current EC2 instance the domain is sending traffic too.  Currently the Health checker is coming back healthy.7 - Healthy check1.PNG

Another way to check what instance the domain is using, is by running a record set test. This just goes and grabs the current IP address and information the domain is using and as we can see it is using Web-Application-1.

8 - checking DNS.PNG

Test the fail over

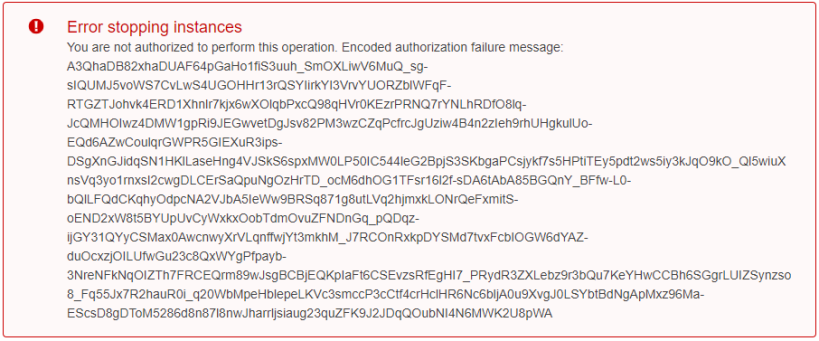
A simple way to replicate a failed system is too, well… turn it off as it safely cuts off all communications to the instance.

9-stoping web-1.PNG

Now the health checker will be receiving errors as its not able to communicate, thus telling the Domain to switch over to the secondary record set. So if everything went well, we should be seeing a new IP address on the record test

10-checking DNS again.PNG

Why use Route 53?

Route 53 solves the issue of don’t put all your eggs in on basket, with your network. It is just good practice to have your infrastructure in multiple locations as a disaster recovery plan. However, it is something that should be really thought of and documented as its basically duplicating the whole infrastructure and that can be very costly. On top of that, with the use of Multiple AZ’s across a region (and each AZ having multiple servers), the likelihood of needing Route 53 as a disaster recovery plan is overkill i personally feel.

I personally would use Route 53 in other ways, like a DNS/Domain router to send users to the right resources throughout your infrastructure.


Academy Cloud Architecting – Module 10

Introducing Amazon CloudFront

download.jpgThis is the second to last lab for the Academy Cloud Architecting certificate, before making the project. For this lab, its all about Amazon’s CloudFront. So what is CloudFront? It is a web content delivery service or more commonly known outside of amazon as a Content Delivery Network. Amazon has geographically distributed servers all around the world and by using CloudFront, customers will just connect to the closest server instead of going to the correct region and AZ for viewing the sites content. By doing this, it gives customers low latency and high data transfer speeds.

For this lab, I will be uploading content to a S3 bucket and then use cloudfont to distribute that content.

Time to Complete: 55 Minutes
Lab Cost: 10 Credits
Version: 1.0.6(spl85)

Store a Image file in a S3 bucket

The overall instructions for this lab is quite simple as from the previous labs and in class teachings, it has become a bit repetitive. So before we upload an image, we need to create a place to store it. thats where amazons S3 comes into play and below is the bucket that i created.

1 -buckeett.PNG

By default, buckets are private and can not be accessed outside of the network without a log in, however for this lab, we want users to be able to view it. So under the permissions tab, we just need to disable the following:

2 - public bucckkket.PNG

For this lab, I went with the NMIT logo and from viewing the URL below, we can see the S3 bucket i created (cf189159), followed by the image name.

3 - web.PNG

Create a Cloudfront web distribution

Now to create the cloudfront distribution service. The set up for this takes quite some time, as amazon is setting up servers all around the world for your customers to go too!

The setup proccess is very simple, just like all Amazon Web Services, Just select the delivery method, which in this case is Web and the origin location, which is the S3 bucket and after 20 minutes of waiting, it is set up and we are givin a domain name for users to go too instead of the S3 bucket itself, like before.

4 - CDN overview.PNG

Link to your object

Now for the fun part of testing out cloudfront. Below is a piece of HTML code that is getting an image by going to the cloudfront domain, then just getting the image. We don’t need to go to the S3 bucket itself, or even name it (which is a good security).

4.1 - code.PNG

Now to test it!

5-local website.PNG

Why use CloudFront?

well after this small exercise, I personally would say this doesn’t really show off the true goal and potential of Cloudfront. The purpose of cloudfront is to give your customers secure and fast loading times to your site by using amazon’s endpoints that are located all around the world. The video below better explains the benefits of cloudfront more than this lab.


Academy Cloud Architecture – Module 7

Implement a server less architecture with AWS managed Services

Continuing with the ACA certificate. This lab will be expanding more into advance uses of lambda, by creating a complete server less system that will receive a transaction files, automatically load its contents in a database and then send notifications. Below is a more detailed explanation of the process.

P1.jpg

Time to Complete: 3 Hours
Lab Cost: 10 Credits
Version: N/A

Use Lambda to process a transaction

P2.jpg

Lets divide up the flow chart into easily manageable chunks. The first lambda function we need to create is a function that processes transaction files and insert items into the customer and transaction database tables. I have gone through the process of creating Lambda’s before, So ill just focus on the python code this time round.

from __future__ import print_function
import json, urllib, boto3, csv

#--------- STEP ONE -----------
s3 = boto3.resource('s3')
dynamodb = boto3.resource('dynamodb')

#--------- STEP TWO -----------
customerTable     = dynamodb.Table('Customer');
transactionsTable = dynamodb.Table('Transactions');

  print("Event received by Lambda function: " + json.dumps(event, indent=2))

#--------- STEP THREE ---------
  bucket = event['Records'][0]['s3']['bucket']['name']
  key = urllib.unquote_plus(event['Records'][0]['s3']['object']['key']).decode('utf8')
  localFilename = '/tmp/transactions.txt'

  try:
    s3.meta.client.download_file(bucket, key, localFilename)
  except Exception as e:
    print(e)
    print('Error getting object {} from bucket {}. Make sure they exist and your bucket is in the same region as this function.'.format(key, bucket))
    raise e

  with open(localFilename) as csvfile:
    reader = csv.DictReader(csvfile, delimiter='|')

    rowCount = 0
    for row in reader:
      rowCount += 1

      print(row['customer_id'], row['customer_address'], row['trn_id'], row['trn_date'], row['trn_amount'])

#--------- STEP FOUR ---------------
      try:
        customerTable.put_item(
          Item={
            'CustomerId': row['customer_id'],
            'Address':  row['customer_address']})

        transactionsTable.put_item(
          Item={
            'CustomerId':    row['customer_id'],
            'TransactionId':   row['trn_id'],
            'TransactionDate':  row['trn_date'],
            'TransactionAmount': int(row['trn_amount'])})

      except Exception as e:
         print(e)
         print("Unable to insert data into DynamoDB table".format(e))

    return "%d transactions inserted" % rowCount

There is quite a bit of code to take in, so lets break it down. Firstly, this lambda is triggered whenever something is uploaded into the S3 bucket, so from there, the code does:

  1. Connect to S3 and the DynamoDB
  2. Define the DynamoDB tables
  3. Get the item that was uploaded into the bucket
  4. loop through all lines of the file and insert the data into the tables

Use Lambda to calculate

P3.jpg
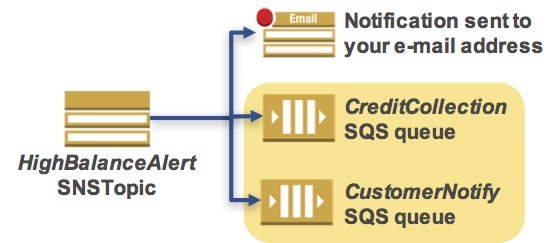
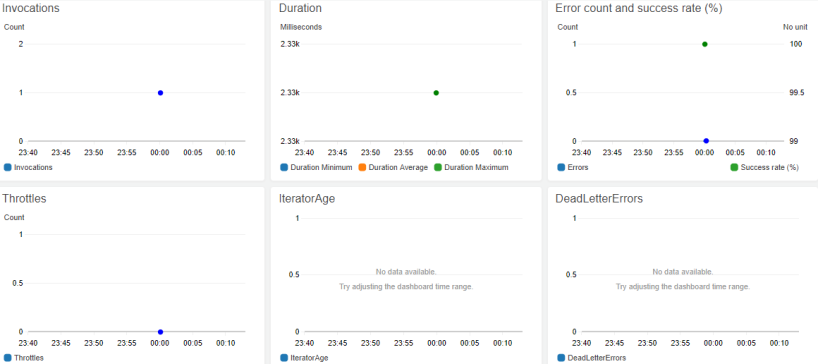
The next lambda that needs to be create based on the flow diagram is a function that aggregates the transactions and updates the total into another table. Then if that total is above 1500, send a message to the SNS. This lambda is triggered whenever something is inserted into the transactions table.

from __future__ import print_function
import json, boto3

#---------STEP ONE -------------
sns = boto3.client('sns')
alertTopic = 'HighBalanceAlert'
snsTopicArn = [t['TopicArn'] for t in sns.list_topics()['Topics'] if t['TopicArn'].endswith(':' + alertTopic)][0]

dynamodb = boto3.resource('dynamodb')
transactionTotalTableName = 'TransactionTotal'
transactionsTotalTable = dynamodb.Table(transactionTotalTableName);

def lambda_handler(event, context):

  # Show the incoming event in the debug log
  print("Event received by Lambda function: " + json.dumps(event, indent=2))

#---------- STEP TWO ---------------
  for record in event['Records']:
    customerId = record['dynamodb']['NewImage']['CustomerId']['S']
    transactionAmount = int(record['dynamodb']['NewImage']['TransactionAmount']['N'])

    response = transactionsTotalTable.update_item(
      Key={
        'CustomerId': customerId
      },
      UpdateExpression="add accountBalance :val",
      ExpressionAttributeValues={
        ':val': transactionAmount
      },
      ReturnValues="UPDATED_NEW"
    )

    # ----------- STEP THREE ------------
    latestAccountBalance = response['Attributes']['accountBalance']
    print("Latest account balance: " + format(latestAccountBalance))

    #--------- STEP FOUR
    if latestAccountBalance >= 1500:

      message = '{"customerID": "' + customerId + '", ' + '"accountBalance": "' + str(latestAccountBalance) + '"}'
      print(message)

      sns.publish(
        TopicArn=snsTopicArn,
        Message=message,
        Subject='Warning! Account balance is very high',
        MessageStructure='raw'
      )

  return 'Successfully processed {} records.'.format(len(event['Records']))
  1. Connect to SNS and the Database
  2. Calculate the total and insert into the total transaction table
  3. Checks to see if the recently inserted data is over 1500
  4. If so, create a message then send it to the SNS

Create a SNS

P4.jpg

Now that the database and lambda’s are set up. We move further down the flow chart to the Simple Notification Service. The purpose off this SNS is to receive a message from the lambda, if the total balance exceeds 1500 and then forward the information to an email address. Once the SNS is created, we are able to add subscriptions, which are ways to notifiy via protocols, like HTTP, Email, etc. For this lab, I will be using Email and SMS. So once I entered my email into the endpoint and saved, I got this test email!

1 - First email by SNS.PNG2 - Comformation.PNG

I also added my phone number as well to test it. I did not receive any kind of conformation message, so i’m unsure if it worked.

Creating QueuesP5.jpg

The last thing to add to this server less system is the SQS queues. Simple Queue Service is the new service for this lab, so what does it do? from the lab alone, i’m not 100% sure what they are needed for and from my understanding is a way to send the one notification to multiple locations, like the admin, customer and credit collection. For this lab, we create two queues: for the customer and credit collector and these queues are both subscribed to the highbalance alert from SNS

3- subcribing queues.PNG

Test the server less architecture

Time to test it! So if everything works correctly, when we upload a file, it will get processed and added into the database, then if there is a total balance exceeding 1500, we will get an email and text message, so fingers crossed I did everything right. Below is the contents of the file.

customer_id|customer_address|trn_id|trn_date|trn_amount
C1|1 Smith Street, London|T01|03/16/2017|100
C2|2 Smith Street, London|T02|03/16/2017|200
C2|2 Smith Street, London|T03|03/16/2017|50
C2|2 Smith Street, London|T04|03/16/2017|300
C2|2 Smith Street, London|T05|03/16/2017|100
C2|2 Smith Street, London|T06|03/16/2017|150
C2|2 Smith Street, London|T07|03/16/2017|400
C2|2 Smith Street, London|T08|03/16/2017|50
C2|2 Smith Street, London|T09|03/16/2017|50
C2|2 Smith Street, London|T10|03/16/2017|10
C2|2 Smith Street, London|T11|03/16/2017|10
C2|2 Smith Street, London|T12|03/16/2017|10
C2|2 Smith Street, London|T13|03/16/2017|20
C1|1 Smith Street, London|T14|03/16/2017|51
C1|1 Smith Street, London|T15|03/16/2017|25
C1|1 Smith Street, London|T16|03/16/2017|27
C1|1 Smith Street, London|T17|03/16/2017|29
C1|1 Smith Street, London|T18|03/16/2017|19
C1|1 Smith Street, London|T19|03/16/2017|33
C1|1 Smith Street, London|T20|03/16/2017|35
C1|1 Smith Street, London|T21|03/16/2017|39
C1|1 Smith Street, London|T22|03/16/2017|41
C1|1 Smith Street, London|T23|03/16/2017|199
C2|2 Smith Street, London|T24|03/16/2017|400

And pretty much instantly after I uploaded the file, I got an email and text message(so it works fast!), but we will get to that soon. Lets check out the database to see if the tables got filled.

Customer Table

4-tables

Transaction Table

5.1 - trans table

Total Transaction Table

5.2 - total table


Now lets check that email and text message, While the message itself isn’t very user friendly, I am able to see that customer C2 has a balance of 1750. If this was my own alert, I would have more information about the customer, like email, phone and name so we could contact them to discuss why their balance is too high.

Email

5-Email notification

Text Messagetext


Now to check out the SQS, I don’t overly understand it, but I am able to see when it was sent, and received, what alert was triggered and other information.

6-que


Last thing to check is the lambda’s themselves.

Sidenote: I edited the images to have bigger dots on the chart to see better.

Transaction Processor Lambda Monitor8-total notifyer

Total Notifier Lambda Monitor7-Transaction

Academy Cloud Architecting – Module 5

Automating Infrastructure Deployment with Cloud Formation

cloud fornation logo.png

Continuing with the automation theme, this lab takes the automation to the next level by introducing another Amazon Web service, called Cloud Formation. At it’s simplest form, Cloud Formation provides the business with a common ground to describe and provision all resources within the cloud, without the need to manually document and archive your infrastructure by multiple different people throughout the years.

For this lab, I will be taking you through how to deploy multiple layers of your infrastructure, update and delete a stack!

Time to Complete: 2 Hours
Lab Cost: 10 Credits
Version: A6L5

Deploying a network layer

By deploying the network layer independently of the other layers(database and application), we are able to reuse the network infrastructure in other situations, which is always good practice. We deploy the network first as the application and database layers need/use the network layer within their code and installation. So after downloading the .Yaml file of the whole network, I am able to set it up, just by giving cloud formation the code.

1 - Creating a stack.PNG

And Done! Cloud formation goes away and executes the code, which creates a VPC, subnets, Gateways, Route tables and connects it all up!

1 - resource for network.PNG

Deploying an application layer

Now to repeat the same process with the application .Yaml file that was supplied for the lab

3- App stack.PNG

And just like before, it goes and does its thing and there we have it! an instance, security groups and a volume. Doing it this way is a lot faster!

4 - App Resources.PNG

The amount of detail and content you can code into these cloud formation files seems limitless, we are even able to create a fully dynamic website.

5-web browser.PNG

Updating a stack

From my own understanding, Cloud formation does a git styled version control, so when updating a stack, instead of deleting and re installing the whole stack of resources, it just edits and updates the only resource that has changed between updates. To test this out, we have been given another .yaml file to add SSH into the security group.

Before:

6 - HTTP rule

After:

7-new security group

Explore templates

So far, from viewing the .Yaml code, this has really interested me in how much detail and automation is created from these files. As an IT guy, I can just image how much documentation this must cut down by having your companies entire infrastructure in just a couple files. But wait, it gets even better. Amazon also offers a fully graphical user interface with drag and drop options for generic frameworks, like an instance, security groups, VPC’s and pretty much all services they offer. The image below is of the application layer in the GUI environment.

8-Designer.PNG

Delete the stack

After the developer in me spending a bit too much time messing around with the code and GUI designer, I had to get back on track with the lab. The next feature this lab explores is the deletion of a stack, which in most cases you wouldn’t need to do. However when you do need to do it, you are able to set events and code to run on deletion, called a deletion policy. For the application layer, its policy is to save a snapshot of the EBS volume before deletion, to save all the data from the web server.

10-snapshot.PNG

Why use it?

I personally feel like this section isn’t even needed for Cloud Formation as I haven’t seen any reason not to use it! For starters the service is free (the resources you create from it, may not be) and it gives the company a centralized location to manage how the infrastructure will operate, without pages and pages of different documents gaining dust over the years.

Academy Cloud Architecting – Module 4

Using Notifications to Trigger AWS Lambda

lambda logo.jpg

Continuing from Lab 3 of the ACA certificate, we are learning more automation and triggers to better benefit the admin and make our network less human intensive. For this lab we will be using AWS Lambda to do things automatically based on notifications and events that occur within the VPC. so what is AWS Lambda? Basically, amazon have created a service that lets consumers run code without managing a server.

The objective of this lab is to create a lambda function to automatically snapshot and tag new EC2 instances launched by the auto scaler.

Time to Complete: 3 Hours
Lab Cost: 10 Credits
Version: A5L3

Create a SNS topic

SNS stands for Simple Notification Service, which is just a messaging service to send notifications through out the VPC. Creating a SNS is very straight forward within the lab tutorial as we did not mess around with the advanced settings, just gave it a name.

1 - creating SNS.PNG

Configure auto scaling to send events

Attaching a SNS to a scaler is just as simple. all that is needed is to select the group, notifications tab and create a new one. For the lab, we want the SNS to trigger each time a new instance is launched.

2 - attaching SNS to scale.PNG

Create a lambda function

So far, we have a set up of whenever the scaler creates a new instance, it sends a notification to the SNS. Now we need to make the SNS send a notification to Lambda to run some code! but before that, we need to create the lambda.

An amazing this with lambda is it needs to have a Role, just like a user’ / group. this is so the code doesn’t do anything it isnt’ allowed to do. For this function, we are using Python 2.7

3 - creating lambda.PNG

Below is the code. From reading it, it creates a snapshot all the EBS volumes, then after that is done, add a tag to the instance saying “Snapshot = Created”.

4 - lamdba code.PNG

Scale out to trigger the lambda

An easy way to test this is by just increasing the size of the scaler from one to two. After doing that we can see the scaler is creating another instance. So did the lambda work?

5-scale.PNG

When viewing the instances tags, the snapshot tag wasn’t there, so if I go back to the lambda page, I was meet with this error. By the looks of things, aws has recently updated how their tags work and the permission role doesn’t have the new tag permission.

5.1-failed tags.PNG

However, good news for whoever wrote the code as they create the snapshot first before the code fails, so the snapshot worked!

6-snapshot.PNG

Why use this?

Now that the lab is over, why would we need to use lambda and SNS in a real world environment? Well first off, the automation of these two things, combined with a load balance and scaling group can create basically a sudo A.I. web System that can manage itself without the need of an admin, so it will drastically cut down time and resources.

So what are some things we can use it for? well just within the range of instances alone, we can send a notification when an instance is: created, terminated and if failed each of them. by that alone, a good practice would be to have a lambda go off if the instance failed to be created. The possibilities are endless of what this combo can accomplish, so lambda has some limitations:

  • The disk space (ephemeral) is limited to 512 MB.
  • The default deployment package size is 50 MB.
  • Memory range is from 128 to 3008 MB.
  • Maximum execution timeout for a function is 15 minutes*.
    Requests limitations by lambda:
  • Request and response (synchronous calls) body payload size can be up to to 6 MB.
  • Event request (asynchronous calls) body can be up to 128 KB.

But even with this, It still is an amazing skill to use when creating a network.

Academy Cloud Architecting – Module 3

Making your environment highly available

Now for my NET701 class, we are shifting towards doing the ACA certificate now and because we have already done the ACF certificate, we are able to skip the first two labs.

The purpose of this lab is to learn how to efficiently make an application have highly available by having duplicate instances across availability zones. By doing this, we will have a network structure that even if one goes down or is having high traffic, it can be pasted over too the second one.

Time to Complete: 3 Hours
Lab Cost: 10 Credits
Version: A5L5

Inspect your environment

Currently, while the lab is setting up. I will review the starting diagram of the network architecture I will be dealing with for this exercise. So far, we have two subnets, one public and the other private all in one AZ. within the public subnet, we have a configuration server, which by the name, my guess is setting up they application servers.

starting structure.jpg

Now that the lab is set up, lets look into the structure more closely. First lets view the Virtual Private Network to get an understanding of the environment. From the image below, We are able to see that IP network is 10.200.0.0/20

1 - VPC CIDER.PNG

How about the subnets? it is worth nothing the current AZ, which is us-east-1a

2 - Public subnet 1.PNG

So far, the current Security group rules that the configuration server has is as follows:

HTTP – for web browser access from anywhere

SSH – Remote login from anywhere

3 - Security group for SG server.PNG

Last thing to view is the configuration server as we need its details to be able to view and remote into it.

Public IP: 3.83.43.76

4 - Config Serv Desc.PNG

login to Amazon EC2

From the prevous labs, we used user data to auto create the http server and fill the index file with information, however this time round the user data is empty and so we will need to do it ourselves.

5 - No user data.PNG

To remote into the server, I just used puTTy, which is always the same process as always. enter in the IP and add the PPK file under the Auth settings and boom! we are in

6 - Putty into config

Launch a PHP web application

Whenever dealing with a fresh AWS instance, the best thing to do is update and patch it. this is done easily by using the following line. What the command is asking what updates are out there and auto say yes to the download (-y)

 yum -y update

With the instance all patched up and ready to go, this is where we can install whatever purpose the instance is for. In this case it is a HTTP server and there is quite a bit of code to be done, so i will show all the code i used, then break it down(each line should be done by them self.

sudo yum -y install httpd php

sudo chkconfig httpd on

wget https://us-west-2-tcprod.s3.amazonaws.com/courses/ILT-CUR-200-ACACAD/v1.1.1/lab-1-ha/scripts/phpapp.zip

sudo unzip phpapp.zip -d /var/www/html/

sudo service httpd start

Line 1: install a Apache HTTP server and PHP support for that server. This is basicly doing an OS install on the instance.

Line 2: edit the config file to auto turn the HTTPD server on when the instance starts

Line 3: Go download the file from this weblink, which is a zip file

Line 4: unzip the newly downloaded file in the html directory

Line 5: Start the server up!

and with that out of the way, what happens now when we go to the public IP address of the newly updated config server?

7 - Web application.PNG

We are greeted by this php application detailing the IP adress and what instance and AZ it is in.

Creating an AMI

now that the web server is configured to what we want, time to create an image so it can be easily replicated and backed up.

8 - Image creations.PNG

Configure an availability zone

So far we haven’t actually changed anything from the architecture from the beginning design as it is all still in the one AZ, So now I need to plan out what is the next AZ i will be using:

Current AZ: us-east-1a (use1-az2)
Second AZ: us-east-1b (use1-az4)

The purpose of the second AZ is the have a replicated architecture of the current AZ(1a), so I need to create the two subnets, NAT gateway and route table.
Public subnet 2 ID: subnet-0f2f9e7ce97920797
Private subnet 2 ID: subnet-062fe1daa1a50e533
Nat Gateway 2 ID: nat-0826bf8f2dbed10f5

Create an application load balancer

The purpose of a load balancer is to divide out the traffic to the different subnets within a VPC and from the review below, we can see that this load balancer is in front of the two public subnets and thus evenly divide the load between the subnets(and AZs).

13-BL1.PNG

Create an auto scaling group

The purpose a scaling group is to create and terminate instances dependent on the traffic. For this group, It will be creating instances from the AMI I created earlier. Also, because we know it works, we don’t need to remote into it so SSH isn’t needed. Lastly, For the purpose of testing the lab, the minimum and maximum instances is 2, so if one goes down, another is created to replace it. The technology behind this ratio to how easy it is to set up is amazing.

14-AutoScale.PNG

15-Configure AutoScale.PNG

After it has been created, we are able to view the instances that have been created and from viewing the highlighted area, we can see one is in AZ 1a and the other is in AZ 1b.

16-Instances by Scale.PNG

Test the application

Time to test it! if we repeatedly refresh the web link given by the load balancer, We can see that instances change by seeing the IP change, instance ID and AZ.

This slideshow requires JavaScript.

Test high availability

So now lets simulate an instance breaking or shutting down. We can do this by stopping one instance and in this case, the one in AZ 1b

19-Stoping instance

So what happens next? well the auto scaler picks up an alert that sees there is only 1 instance running within its groups so it creates another one to replace it. after a couple minutes another instance is added all while the load balancer directs all traffic to the one instance so there is no down time for the client! amazing right?

20-New instance

And here is the new instance! and I didn’t have to do anything, just sit back and watch. This is really good for when the admin is either away, asleep or off the clock as they can rest easy without worrying about the potential consumer loss the company has if a server went down.

21-new instance browser

Academy Cloud Foundations – Lab 6

Introduction to AWS IAM

What-is-IAM-in-AWS-and-How-to-Create-user-in-IAM.pngIAM stands for Identity and Access Management and from my understanding it is the active directory of cloud services. The purpose of IAM is to manage users, groups, roles and policies. As this is my third year within networking, I am well diverse within how Active Directory works, so it will be interesting to see how this differs from it.

Time to Complete: 2 Hours
Lab Cost: 10 Credits
Version: 3.1.2(spl66)

Users and Groups

From looking into how the users and groups work, so far it is not any different. Everything thing is the same and for this lab we have three users and three groups. Currently, each group has a Json script the writes out the groups permissions.

EC2 Support Group Permissions

Below is the JSON script and from reviewing what it says, this group is allowed to the users to view the description of all (*) EC2 instances, same with ELB and autoscaling. Cloud watch has more things that the user is allowed to use and then EVERYTHING else is auto denied, like S3,etc.

1- EC2 Support Permissions.PNG

S3 Support Group Permissions

The users in this group have a smaller list. They are only allowed get S3 information and list them from all S3 buckets.

2 - S3 support permissions.PNG

EC2 Admin Group Permissions

Well the only difference, between this and the support group is the allowance of starting and stopping instances

3 - Admin permissions.PNG


Adding Users to groups

Not much to discuss here, its the same as active directory, actually easier with less clicks!

Sign in and test users

So by going the the AWS and login to the console. if we have a account Id(which usually would be the business name), we are able to use the User’s that were made to actually sign in and operate the services. For starters, we will use user 1, which is apart of the S3 support group.

5 - Sign in with user-1

After signing in, we are able to view the S3 buckets perfectly, here is a list of what is inside one of them.6 - S3 example

Now how about the EC2 instances? we are meet with this user is un-authorized to view any information7 - EC2 with user1

Lets step over to User-2, which is part of the EC2 support group, So we are able to view the instances, but how about stopping? well we are also meet with an un-authorized error, saying we are not allowed to do that.8 - error stoping

And well, based on the permissions, was user-3 who was part of the EC2 Admin group allowed to stop the instance? sure can!

Why do we need this?

While this lab was a short one, It is highly useful. As it shows us how detailed and easy we can set permission through out the business. By using Users and groups, we are able to replicate the business structure within the cloud by only letting employees use what they need for their tasks and nothing else. Sounds kind of mean doesn’t it? it kind of does, until you think about it in a business sense, because for example. while the receptionist doesn’t mean ill harm, they don’t need to be authorized to turn off the web server(and if they accidentally do, dependent on the size of the company, can cause a lot of damage), but will need access to printing off customer details that are stored in the S3 buckets.

Academy Cloud Foundation – Lab 5

Scale and Load Balance your Architect

ELB.png
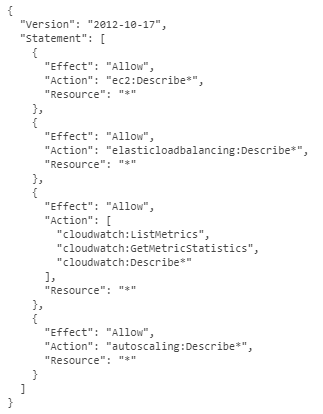
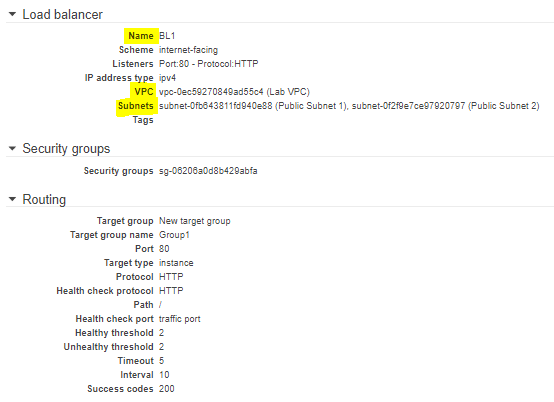
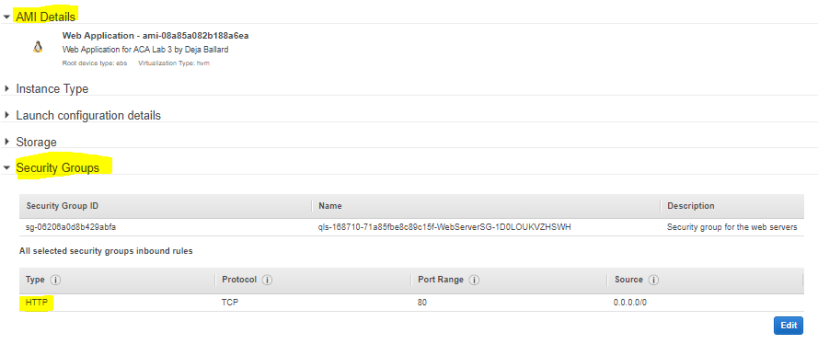
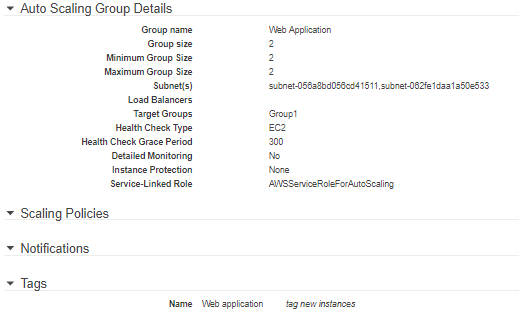
Lab 5, one more after this and the foundation course is done! From the overview, this lab will take me learning about amazon’s Elastic Load Balancing and Auto Scaling services. The point of these services it to automatically distributes the application traffic across multiple instances and also automatically scale the instance’s capacity out or in dependent on what the admin defines.

Below is the starting infrastructure for the lab.

lab diagram.jpg

Time to Complete: 2 Hours
Lab Cost: 10 Credits
Version: 4.5.1(TESS3)

Create an AMI for Auto Scaling

AMI within amazon stands for Amazon Machine Image, which is simply like an ISO or a copy of an instance. For this lab, I’m creating an image of the webserver, So whenever the server gets overwhelm by traffic, it can create more of the same instance.

1 - Creating image.PNG

Create a Load Balancer

Now to create a balancer, this will balance the load of the traffic over multiple instances. Information worth noting is how the health checking works within ELB. Health checks are used to determine whether a target within the target group is available to handle traffic. From the image below, my check settings is to see if the instance doesn’t reply with 10 seconds, every 30 seconds and if it fails, It knows that this instance is taking too much of the traffic, so it balances it out between the rest of the grouped instances.

2 - Health settings.PNG

And this is the full review of the load balancer.

3 - Review ELB.PNG

Create a Launch Configuration and an Auto Scaling Group

Now what happens if all instances withing the ELB are at full traffic? well we scale outwards by creating more instances. If it wasn’t for cloud services, we would need to buy a whole new server, set it up, etc, etc. however with AWS, we can just set up some software to create us a new instance instantly and add it to the balancer, which makes things a lot easier.

Below is the review details for the scaling group. As we can see, it will create an instance from the Web server AMI, which is what I created earlier.

4 - Scaling review.PNG

Now we need to set when should AWS create a new instance, to do this, we make an alarm. This alarm checks to see if the CPU usage is above 65% for at least a min, if so, create a new instance. its that easy!

5 - Alarm

Verify Auto Scaling is Working

So if everything went correctly, we should have a working architecture that balances and scales when needed. Lets see if everything is working before we test it. Below we can see two instances, that are across two different AZ’s and are set up to balance the traffic between themselves.

6 - Target groups overview

Testing Auto Scaling

Now to test it all out. To do this, I can use my browser to view the webserver and select a “Load Test” button, which makes the CPU run at 100$

Here is all the instances, before load testing

8 - Instances running

And this is after, as we can see, the cloud is begining to set up a new instance for the web servers to send some of the traffic too!

9 - Triggered


Academy Cloud Foundations – Lab 4

Build Your DB Server and interact with your DB using an App

Amazon-RDS-1-1.png
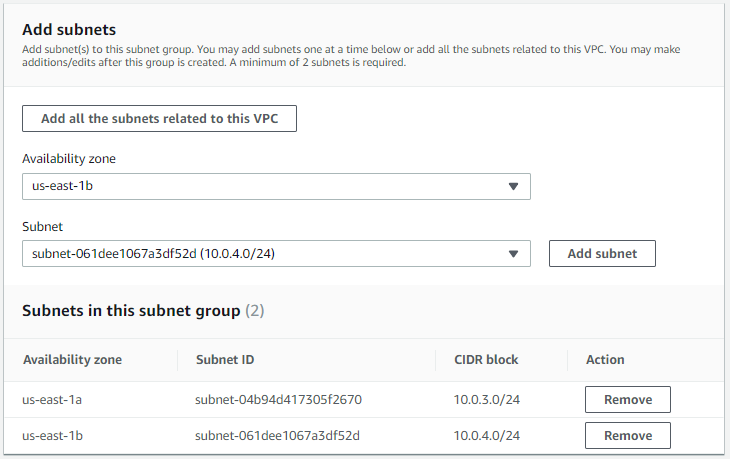
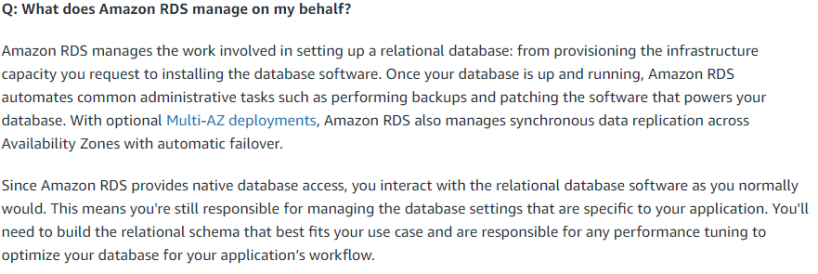
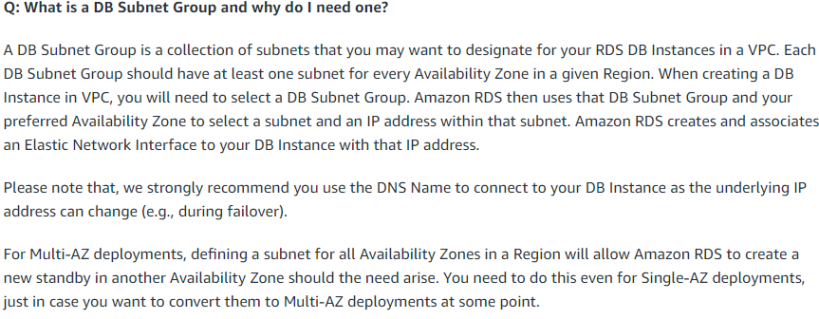
Lab four is all about how to deploy a database via amazons web services, then access it from a web application. Amazon allows you too choose from six different database engines, including my personal favorite MySQL:

  • Amazon Aurora
  • Oracle
  • Microsoft SQL Server
  • PostgreSQL
  • MySQL
  • MariaDB

Below is the starting infrastructure that lab four starts with. As described below, the VPC spans across two AZ’s, each having a public and private sub net. AZ a has a  Network Address Translation Server and AZ b has a Web Server.

lab1diagram.jpg

Time to Complete: 2 Hours
Lab Cost: 10 Credits
Version: 4.5.1(TESS2)

Create a VPC Security Group for the RDS DB Instance

So this will be my first time using a database within a cloud service, so there may be a bit more photo’s this time around so I can come back to remember the process. So first thing in the lab was to create a new security group, which I’m more than familiar with by now. This time round I added the MySQL protocol to the security group (Note: See if you can spot what I did wrong?)

Inbound sec rules

Create a DB Sub net group

Now onto something semi new, I have created subnets plenty of times, but this time round I am creating sub net groups. The purpose of a subnet group is used to assign your database instances to, this is so you can backups across subnets and AZ’s. By default, AWS makes a Writer instance and a Reader instance across the subnet group.

db subnet 2.PNG

Create an RDS DB Instance

Time to create the database, It is actually quite simple, just following AWS’s very easy guides. Just take the time to read everything and enter in the right details.


db details 1.PNG

db advanced settings.PNG

Now it takes some time to start up the database, as it needs to create at least two instances across the security groups,  so while I am waiting for the database to set up, I reviewed some of amazons FAQ for RDS and here are some questions I found that helped me better understand the areas I was unsure of while doing this lab.

FAQ 1FAQ 2faq3

Interact with the Database

Now its all ready to go! So after going to the web server on my browser and logging my details in, I was meet with this error.

SQL error connection.PNG

Which, isn’t always the best, I think I may have gotten the endpoint wrong as there was two on the screen(two database = two end points), but even after trying the other endpoint, nothing changed. But the great thing about AWS, is I can just quickly start up another brand new database, to see if I missed a step and did something wrong. I did this before looking into the error as it doesn’t take long to create another database and well that’s the whole purpose of AWS. So did it work with the second database?

sadly not.

Now to take to troubleshooting. Amazon, has a very nice and easy to read checklist of what might be going wrong, so down the list I go:

  • Is the instance in the Available State?
    • Yes
  • Are the security groups associated with the DB instance?

This is where I went wrong, I mistakenly added the mySQL(port 3306) access in the web server’s security group, not in the db security group and by default, security groups denies everything unless explicitly told not too via a rule. So once I applied the new rules it worked perfectly. I was even able to add myself to the database.

addressbookaddressbook2

Reflection

Even at level 7, my third year into my degree and I’m still prone to the infamous  accidentally miss click, which sometimes can take hours to find. Luckily this was just a small lab and I was able to quickly Identify and solve the problem.

Academy Cloud Foundations – Lab 3

Build your Virtual Private Cloud and Launch a Web Server

Lab three is about creating my own VPC and add additional components to it to produce a customised network. I believe this lab will be easy as we have already gone through this with Mark within class time.

Time to Complete: 2 Hours
Lab Cost: 10 Credit
Version: 4.5.1(TESS1)

Create a VPC

This time round, the lab wants us to use the VPC wizard, instead of creating everything ourselves and to be honest, if i hadn’t already done this in class, I wouldn’t of really understood what I was creating as its all done behind the scene. Below is some information about the VPC I made.

vpc with pub and pri.PNG

vpc details.PNG

Add Sub nets

In the task above, we already created sub nets, but for the purpose of this lab, we are also creating more. Below is an image of the second public network. The private was very similar, apart from being apart of a different AZ and different CIDER Block(10.0.4.0/24).

subnet 2.PNG

After creating the sub nets, I needed a private route table and a public one, to route the sub nets correctly.

Adding Security Groups

now to create a security group. Security groups are basically the stateful firewall for the instances you create. The security group I made was to allow HTTP access, which is port 80 from anywhere.

Security Group.PNG

Launch a Web Server Instance

I have gone into more detail about launching a Instance in a previous blog, the only difference this time is the advance start up code. The code below is using the Yum commands to install not only HTTP, but PHP, MySQL and PHP-MySQL. then starts the HTTP server and collects content from the amazon course and adds it to the HTML files.

#!/bin/bash -ex
yum -y install httpd php mysql php-mysql
chkconfig httpd on
service httpd start
if [ ! -f /var/www/html/lab-app.tgz ]; then
cd /var/www/html
wget https://us-west-2-tcprod.s3.amazonaws.com/courses/ILT-CUR-100-ACFNDS/v1.0.12/acf-lab3-vpc/scripts/lab-app.tgz
tar xvfz lab-app.tgz
chown apache:root /var/www/html/rds.conf.php
fi

and here is the results!

webpage.PNG

Reflection

I would say this is a very short and not very descriptive lab. If this material was my only source of understanding for VPC’s, i would feel a bit lost to be honest. However practice makes perfect and redoing the creation of a VPC is always good.