Lab Thirteen Journal – Monday 08 October

Lab Overview

The purpose of this lab will be to implement an Intrusion Detection system to monitor packets on the LAN router.

This lab includes RT-INT, RT-ISP, RT-LAN, KALI, WIN2016-DC, SECONION, WIN2016-MS follows the CompTIA Security+ Certification (SYO -501) official guide which includes three exercises for lab thirteen.

lab 13 overview.PNG

Note: layout has been modified from the lab as only INT03-3110DejaS6 has mirroring enabled.

Exercise One – Configuring Sensor

The sensor that i will be using for this lab is called Security Onion. This is a Linux Operating system, that is built from Ubuntu and contains many security tools like suricata, network miner, Sguil and many others. For this exercise, i will be using Sguil, which is a network security monitoring system. Before starting up the SECONION, i will be connecting it to the INT03-3110DejaS6 virtual switch, so it can monitor the information coming and going from the 10.1.0.0/24 network. With Sguil running i can now test the monitoring by pinging a device in the 10.1.0.0/24 network from outside.

I will be using KALI(192.168.1.100) to ping the WIN2016-DC (10.1.0.1).2018-10-05_18-01-24

2018-10-05_18-02-12

As we can see from above. we are able to watch how the ping message got to the target.

Exercise Question – What is the Rule SID

2100366

2018-10-05_18-05-42

A great feature that sguil has is grouping the events together, compared to wireshark, it lists every single event, even i it is a repeat. Under the CNT tab, this means how many events correlated with this source IP, Destination IP, Port, etc. Upon expanding, we are able to view 7 different times this even occurred.

2018-10-08_13-04-23.png


Exercise Two – Tuning the Ruleset

within sguil, we are able to create rules to modify the monitoring software and what it monitors. We can do this by modifying a config file in the OS from the terminal.

2018-10-08_13-38-11.png

the first rule be to disable the alert for anything that falls under the SID 2100366, which is the ping from KALI.

Note: the book says to write “sudo ruleupdate” to update the system with the new ruleset, however this incorrect. it needs to be “sudo rule-update”.

2018-10-08_13-45-03.png

lets test pinging the WIN2016-DC again. however did not work, It looks like something is wrong with how the rule was set up by the book, so ive done my own research into how to disable SID from triggering the alert system.

Managing Alerts from the Security Onion Website

  • Append the signature you wish to disable in the format gid:sid. The generator ID is most likely going to be a “1” in most cases. You can check the generator ID by checking the exact signature. If a gid is not listed, it is assumed to be “1”.

Even from multiply searches, the file seems to be correct, even after multiply restarts and updates, still does not work.

Exercise Three – Examining Intrusion Incidents

now to test the intrusion dection by using zenmap and hping 3 and targeting the WIN2016-MS (10.1.0.2/24)

KALI Zenmap scan was able to find

  • Ports Open
    • 25
    • 80
    • 135
    • 139
    • 143
    • 445
    • 587
  • Topology
    • 192.168.1.100 -> 192.168.1.254 -> 172.16.1.253 -> 172.16.0.254 -> 10.1.0.2
  • Host details
    • State: up
    • Open Ports:7
    • Filtered ports: 993
    • closed ports: 0
    • scanned ports 1000
    • up time: 23087
    • Last boot: sun Oct 7 12:21:16 2018

SECONION Sguil alerts from zenmap attack

2018-10-08_14-47-37.png

KALI DoS attack with hping3 results

2018-10-08_15-01-54.png

2018-10-08_15-07-28.png


Lab Twelve Journal- Saturday 01 September

Lab Overview

The purpose of this lab is to learn all about firewalls, how to implement them, issues we may face and other firewall basics.

This lab will be using RT-INT, RT-LAN, PFSENSE, KALI, WIN2016-DC, WIN10-WS, LAMP16 and follows the CompTIA Security+ Certification (SYO -501) official guide which includes four exercises for lab twelve.

Exercise One – Setting up pfSense

So what is pfSense? From having a quick search, it is an open source firewall/router that is run on the FreeBSD Operating System. Most people think firewalls as a software addition on your system, however in this case, it has a whole machine dedicated to it. So with it being already installed and set up by the lab, how do we access it?

We can use the WIN10-WS to connect to its web server and configure it remotely. However before we can do that, the firewall that Mark gave up appears to not be set up correctly, as the IP address wasn’t working, so i went into the systems terminal and updated the LAN port with 10.1.0.254/24. now i am able to remotely log in by entering in “https://10.1.0.254/” into internet explorer.

Continued Wednesday 03 October:

Since i last attempted this lab, i have set up complete routing through out the network. when viewing the diagnostics of the IPv4 routing, it does not show the correct default gateway. To solve to issue, i went to system -> routing -> gateways and created the following gateway.

chrome_2018-10-03_15-55-07.png

now to test the trace routing by using MTR under the diagnostics tab. based on the lab, they want the user to enter “www.web.local” however i don’t think the LAMP server is set up correctley, so ill use its IP address instead.

chrome_2018-10-03_16-02-09.png

It was not able to connect to the LAMP, i knew this was going to happen as when using the RT-INT router, it isnt able to ping the LAMP either. The pfsense web interface also offers status and system logs. here are some:

Interfaces

chrome_2018-10-03_16-07-34

Monitoring

chrome_2018-10-03_16-09-55.png

Traffic – WAN

chrome_2018-10-03_16-11-48

Traffic – LANchrome_2018-10-03_16-17-01

System Logs

chrome_2018-10-03_16-20-34.png

Firewall Logs

chrome_2018-10-03_16-20-50.png

Note: The firewall entries have been from testing lab sixteen with connecting a VPN.

Exercise Two – Firewall Rules

For the exercise, i will be setting up a simple rule that allows external requests to a host on the local network. This will be done by adding a port forwarding rule under the NAT settings.

chrome_2018-10-03_16-25-52.png

The port forwarding rule above is telling the firewall to redirect the http requests to 10.1.0.10. Based on the lab, they want the user to redirect external users to a website that is hosted under 10.1.0.10, however i have not got a web server on that IP, so i have since changed the port forwarding to 10.1.0.1, to show the default web page of the domain controller. This did not work, it just showed the login screen for pfsense. After researching through the netgate troubleshooting documents, they suggust enabling NAT reflection under the system – > advance settings. Still did not port forward. but i should probably move forward with the lab

Next is demonstrating an example of a blocking rule. the following rule is set up to block any communication with hosts on 192.168.1.0

chrome_2018-10-03_17-02-01.png

After connecting the KALI to this network. this is the response:

Rule on

chrome_2018-10-03_17-11-53

Rule Off

chrome_2018-10-03_17-12-34


Exercise Three – Network Scans

For this exercise we will be using Suricata, which is a package installed with pfSense. it is capable of intrusion detection and intrusion prevention. we will be using this to stop the kali system from getting into the network. To set up Suricata, it is located under the services tab. I will be monitoring the WAN interface, that blocks all offenders.

Kali scan while blocked

  • ports 53 and 80 open.
  • hosts unknown
  • topology unknown
  • host details
    • state up
    • filtered ports – 998
    • closed ports – 0
    • scanned ports – 1000

Kali scan while not blocked

  • ports 53 and 80 open.
  • hosts unknown
  • topology
    • local host -> 192.168.1.254 – > 172.16.253 – > 172.16.0.254
  • host details
    • state up
    • filtered ports – 998
    • closed ports – 0
    • scanned ports – 1000
    • up time – 10
    • last boot

Im unsure if this was successful.

Exercise Four – DoS Tools

In this exercise we will attempt to attack the network with a Denail-of-Service attack. we will be using Low Orbit Ion Cannon to test this, by flooding the target with packets. To do this, we will be using KALI, like always.

chrome_2018-10-05_14-40-08.png

Upon hitting the start button, under the attack status, the “requested” number shot up and continued to raise, by the end it had 98465063 under this tab. When veiwing the alerts of the suricata, nothing showed up. Im currently unsure why.

Another DoS tool is hping3 that is run under command line.This time, it will be a SYN  attack, which compared to last time, is designed to consume space, thus preventing other sessions from doing their jobs. The purpose of SYN, is the beginning of a new communication between devices, so by flooding the targeted device with constant new communication, it eats up resources. below is the command i will be using for this attack.

hping3 -c 1000 -d 120 -S -w 64 -p 80 --flood --rand-
source 172.16.0.254
  • hping3 = tool being used
  • -c 1000 = packet count and amount being sent
  • -d 120 = data size of packets and the size
  • -S = set SYN flag
  • -w = winsize set to 64 (default)
  • -p 80 = destination port set to port 80 (http)
  • –flood = send packets as fast as possible
  • –rand-source = random source address mode
  • 172.16.0.254 = the target of the attack

When i hit enter, i went to check the pfsense firewall app and it should start to slow down and stop. however it didn’t. So i stopped the attack, to find this.

chrome_2018-10-05_15-10-53.png

chrome_2018-10-05_15-11-22.png

The firewall automatically blocked the attack.


Lab Sixteen Journal – Tuesday 18 September

Lab Overview

This lab is all about a Virtual Private Network, commonly called VPN. VPN allows to locations to be networked together via a third party location. VPN implements an extra layer of encryption that prevents eavesdropping, replay, modification and other attacks.

This lab will be using RT-INT, RT-ISP, LAMP16, PFSENSE, WIN2016, WIN2016-MS, WIN10-WS and follows the CompTIA Security+ Certification (SYO -501) official guide which includes four exercises for lab sixteen.

lab 16 overview.PNG

Exercise One – RADIUS

So what is a RADIUS Server? RADIUS stands for Remote Authentication Dial-In User Service and the purpose of a RADIUS is that it enables remote access servers to communicate with a central server. Im unsure currently with my knowledge of RADIUS and VPN how they will interlock with each other, but i’m sure this lab will expand on it. So firstly i need to add a RADIUS client on the WIN2016-DC system. I am able to do that via the Network Policy Server (if not installed, locate under “add roles and features”). Below is the result of my new RADIUS.

chrome_2018-09-18_12-00-23.png

Alongside the new RADIUS client, I need a new network policy for the VPN.

chrome_2018-09-18_12-04-10.png

Now to access the Firewall and apply these new RADIUS and policy settings, however for some unknown reason, internet explorer couldn’t load the web configuration passed the login screen, even with correct credentials. As a result, I went back into the RADIUS client properties and switched the shared secret from generate to manual, then used the following “123”. This is because i will have to navigate the web app from the WIN10-WS system and im un-able to carry over the long generated code. While using a manual security password is not good practice, this is just for a small work around.

chrome_2018-09-18_12-20-36.png

Exercise Two – VPN Concentrator

We will be using the pfSense as a firewall. There is a lot of configuration in this exercise so it will mainly be screen shots of settings. Firstly we will need to install a digital certificate. On WIN10-WS, back on pfSense’s web app, we are able to add a new certificate, but before that, we need a certificate authority. Below is the configurations for my CA.

chrome_2018-09-18_13-43-15.png

Now with the CA set up, we can create a certificate for the VPN.

chrome_2018-09-18_13-48-19.png

Next is setting up a IPsec VPN for mobile clients. IPsec is a protocol that encrypts packets sent over an IPv4 network.

chrome_2018-09-18_14-22-47.png

Once IPsec is set up and has been applied to the firewall, next is setting up the IPsec Tunnels. Tunnels are used to encrypt the entire IP packet, authenticated then encapsulated into a new IP packet with a new IP header. This is used so external watchers can’t see the content or who it was sent from. Phase One is about setting up the key exchange and authentication methods.

chrome_2018-09-18_13-54-10.png

Phase two is setting up the encryption model, we will be using all default pfsense settings and SHA256.

chrome_2018-09-18_13-55-39.png

With Certificates and IPsec configured, we just need to add a firewall rule to activate and implement these rules.

chrome_2018-09-18_13-57-28.png

Exercise Three – VPN Client

With the VPN all set up, now its time to configure the clients to use the VPN via the use of a GPO.

On the WIN2016-DC, under Group Policy Management. We need to add a VPN policy and edit the Trusted root certification authorities. From here, need to import the Classroom VPN CA certificate that was created on the WIN10-WS via pfsense.

chrome_2018-09-18_14-54-32.png

now we need to create the VPN. Below are some of the configurations that i set. along side these, under security i enabled advanced data encryption via Extensible Authentication Protocol.

chrome_2018-09-18_14-58-31.png

Switching over to the WIN10-WS system now to adjust some settings. firstly i need to do a gpo update for this system as it wouldn’t have the new VPN policies, this is done via command line and “gpupdate /force”. A quick restart and it should be all ready to go. We need to set up some settings for the ethernet adapters, both for the network and VPN. Below are the settings for the Network settings.

chrome_2018-09-18_15-10-04.pngchrome_2018-09-18_15-09-53.png

VPN configurations was just applying a interface metric like above, but using 10 instead of 15. Now lets test it!

Exercise Four – Connecting to a VPN

The purpose of this VPN is to access the classroom network from a remote location. To emulate this, we will be connecting the WIN10-WS system’s network adapter to INT03-3110DejaS6. If everything was set up correctly, the the alternate configurations should auto activate.

chrome_2018-09-18_15-32-38.png

when trying to activate the VPN, it failed and i figured it would. This is because when trying to set up the typology for the lab, INT01-3108DejaS6 would not forward any traffic, even after doing a “millennium falcon ping attack”. I could only get pinging to work from the LAN network to the RT-ISP. Below is the error i was given and try a couple of solutions i know off from my Networking experience.

chrome_2018-09-18_15-37-13.png

I replaced INT01-3108DejaS6 with INT03-3110DejaS6 to see if it was a faulty vSwitch, with no success. I decided to completely reset the vyos system, shut down and delete all network adaptors. power on, then off again and re add adapters, however only adding INT02-3109DejaS6 as part of typology and INT03-3110DejaS6. After reconfiguring the interfacing i did another “millennium falcon ping attack” and it worked! i was able to ping the WIN10-WS system, eth1 of RT-ISP, but not eth0, so i will do the same solution to RT-ISP. the result was still the same.

Continued Wednesday 03 October:

I got new updated routers and firewall from mark, now to test the connection of these routers first. When loading up the routers, the interface ports do not match the diagram of skillpipe, so i have updated a new one.

lab 16 network.PNG

Along side that, I logged into the pfsense firewall through the web app and disabled all rules and allowed ping requests. just to see if everything is connected correctly.

2018-10-03_13-48-13chrome_2018-10-03_13-48-37

For the WIN10-WS, i enabled inbound and outbound pinging under advanced firewall settings. to further test the connection. We are now able to easily ping throughout the networks and collect information. now to test the VPN and still get the same results. I went to check the firewall to see that was the issue. It looks like it has been blocking the communication.chrome_2018-10-03_16-20-50

I have tried enabling a pass rule for these protocols, but still does not want to bypass the VPN. Based on the marking scheduled, each lab is worth 3 marks, and I believe I have given a good try at problem solving these issues.


Lab Five Journal – Thursday 13 September

Lab Overview

The purpose of this lab is expanding from Lab Four as it is further learning via the use of network scanning tools. This lab focuses on the communication between hosts on the network.

For this lab i will be using RT-LAN,WIN2016-DC,KALI and WIN10-WS. This lab follows the CompTIA Security+ Certification (SYO -501) official guide which includes four exercises for lab five.

lab 5 Overview.PNG

Exercise One – Set up Virtual Machines

I have finally been able to come back to do this lab as our tutor has set up the vSpheres version of port mirroring which is called Promiscuous Mode and is enabled on the INT03-3310DejaS6. This allows for the monitoring of packets that is past via the switch by creating a copy of the packet and sending it to the target analysis system.

With this being done for us by the tutor, the only thing left is to set up all Virtual Machines’s to be using the new virtual switch and give KALI a static IP of 10.1.0.162

Exercise Two – Wire Shark

As this lab was meant to be done earlier on within the course, this exercise is mainly teaching how to use wire shark, firstly by scanning network traffic on the KALI systems eth0 and IP based frames. So i will quickly skim over what Wire shark was able to pick up. It picked up STP, TCP, SMB2, ICMPv6, DNS, DHCPv6 and ARP protocols. It was interesting to observe as none of these protocols where sent or revived by KALI, so I was able to observe the communication between the server and the windows 10 systems. Here are some examples of what Wire Shark was able to pick up:

chrome_2018-09-13_13-37-34.png

Exercise Three – Unsecured Traffic

So what are the risks involved with being able to watch other devices communicate? well in theory, we should be able to see files and other information being sent.

With the current set up of the network, if we create a file, it should be replicated and sent to all other systems.  So on the WIN2016-DC, i created a new folder with a new text file that contains a hidden message.

chrome_2018-09-13_13-48-51.png

Now to add the file to the File and Storage Service share. This allows users on the network to gain access to files. After creating a new file share by using SMB Share – Quick, we are now able to test the monitoring by turning on wire shark again.

chrome_2018-09-13_13-52-17.png

Exercise Question – Does secret$ share file appear on WIN10-WS?

If we just try open up the WIN2016-DC shares folder, we are greeted with thischrome_2018-09-13_13-57-32.png

This is because the new folder hasn’t been downloaded yet, so we need to manually enter the folder name in.

chrome_2018-09-13_13-58-00.png

Exercise Question – Does the secret$ share appear?

When examining the wire shark results, i was unable to find a NetShareEnumAll Response, however i was able to find the confidential file, however i could not read the information.

chrome_2018-09-13_14-24-09

To easily find the packets i’m looking for, i have sorted them by info field. The next one i need to examine is a “Create Response File”.

chrome_2018-09-13_14-28-58

After looking through them, I was unable to find anything of use. Lets try the “Read Response” packet.

chrome_2018-09-13_14-31-49.png

Exercise Question – Does the secret message appear?

Yes, however not as clear text.

Exercise Four – Netcat

For this exercise, we will be pretending that a rouge admin has created a backdoor to send this confidential data. So lets start up wire shark, so it is capturing packets throughout the network and attempt to steal this information by using netcat instead.

Command line from the WIN2016-DC:

cd c:\LABFILES
ncat -l –send-only  c:\servret\confidentail.txt

ncat = the command being used
-l = bind and listen for incoming connections
–send-only = only send data, ignoring received; quite on EOF

Command line from WIN10-WS:

cd c:\LABFILES
ncat 10.1.0.1 > confidential.txt

Here is try results from the wireshark

chrome_2018-09-13_14-45-25.png

Exercise Question – So why didn’t this work?

From observing the wireshark information. it seems that there was an error sending the data because of the protocols being used. I think it has to do with the “–send-only” as it is telling the server to ignore revived packets, so it is being dropped.

Lab Fourteen Journal – Tuesday 11 September

Lab Overview

It has been awhile since i have posted a lab journal as i have been trying to figure out and complete lab twelve with not much success, same with lab thirteen or fourteen either. So i have moved on to this lab. So the purpose of this lab is all about implementing secure network addressing services. DHCP and DNS services, while useful, can be easily targeted for attacks like using rogue DHCP to reconfigure services and hijacking the network.

Thanks to Stephen from SEC602 class, who let us know about a screen capturing software that implements watermarkings. The software is called ShareX .

This lab will be using RT-LAN, WIN2016-DC, WIN2016-WS, KALI, WIN10-WS, WIN07-WS and  follows the CompTIA Security+ Certification (SYO -501) official guide which includes five exercises for lab fourteen.

Lab 3 Overview.PNG

Exercise One – Pharming Site

Just like all labs before, the Kali system will be preforming the black hat hacker. Now trying to set up the pharming site, took me a lot longer than i would like to admit. The code that the lab hav given us was this.

lab 14 broken code.PNG

First thing i dislike about this course is they don’t clearly label if it is one command line or multiply. If you enter this whole thing in, we get a error displaying “Directory error”. after researching what Linux cp command does(just copy and past). I decided to enter just the first line. Still another error. So after even more researching,  I decided to see the files directories myself, to see if that was an issue. It turns out that there is a “space” between “classroom-exploit/*.* and /var/www/html/. so the command was actually asking for all files within classroom-exploit, to be pasted in /var/www/html/ which is a way of hosting servers locally.

Now with the fake website set up. we need to take over the address of the real website.

Exercise Two – Setting Up An Attack

so what we need to do now is set up a way of intercepting the address and we can do this by using “DNSCHEF“. So still on that KALI system, we need to set up a fake dns, by giving it a fake ip, domain, interface and server.

chrome_2018-09-11_15-14-27

after that has been setup, in a different terminal, we need to set up metasploit, which is another open source tool for developing exploit code against a remote target. to do this, we run msfconsole, and set up a fake dhcp so we can implement a DHCP starvation attack.

chrome_2018-09-11_15-12-33

Exercise Three – Implementing Attack

To emulate the process of running out of IP leases, we will just configure the current scope on the WIN2016-DC system, by deleting and deactivating the scope and we will be targeting WIN10-WS, so with the use of ipconfig release and flushdns, The attack is almost ready.

now to run the exhaustion attack, so the WIN10-WS can only go to the KALI fake DHCP. I will be using pig.py -r -i eth0.

pig.py = the program, created by karmorin
-r = release all neighbor ip’s
-i = detect/ print icmp requests
eth0 = interface to send out from

now to go to the website on WIN10-WS.

chrome_2018-09-11_16-40-20.png

Exercise Four – DNSSEC

DNSSEC stands for DNS Security Extensions and is used to prevent this type of attack by digitally signing the scope records. Enabling DNSSEC is very simple on the server side,  as you only need to locate the look up zones and follow to DNSSEC install wizard. (located within DNS tools). Now we need to make sure all computers also use this validation, by editing the domains group policies (located within GPO -> Computer Config -> name resolution policy)

chrome_2018-09-11_16-53-04

With the zones set up, GPO as well, we need to reset the DHCP scope, so all new connections have this new layer of security enabled. now to enable the gpo update and validate the WIN10-WS. here is the result.

chrome_2018-09-11_17-27-14.png

So what happens if we try that attack again? I will be repeating exercise three

Exercise Question – What server provides the lease?

10.1.0.1

Here are the results when trying to reach the fake webstite

chrome_2018-09-11_17-49-57.png


Exercise Five – Switch Security

With the current set up of vSphere, we are up able to configure switches and network adaptors to enable MAC address spoofing.

Lab Eleven – Friday 31 August

Lab Overview

The purpose of this lab will be to implement practices of a secure network after being attacked by an ARP spoofing attack. For this lab we will be focusing on VLAN and subnetting the network to secure it.

Lab Eleven will be using RT-LAN, WIN2016-DC, KALI, WIN10-WS, WIN2016-MS,WIN07-WS and follows the CompTIA Security+ Certification (SYO -501) official guide which includes five exercises for lab eleven.

Lab 3 Overview

Exercise One – Secure Authenticated Application

First things first, we need to set up an application that a man-in-the-middle attack can intercept. For this, we will be setting up a web service within the WIN2016-MS that needs user authentication. To set up a web server we need to have a certificate for the server, I went through how to do this on Lab Seven, so i wont be discussing it here. We can now bind the new certificate to the website via editing the website binding ports. For the rest of this exercise just follow the lab, there isn’t anything that is needed to be discussed as it is just about editing the URL rewriting and redirection by editing inbound rules of the website.

Exercise Two – Man-In-The-Middle

Now to set up the attacker, for this we switch over to the KALI system. For this attack we are going to be using Ettercap, which is a open source tool that can be set up on a LAN. It works by ARP poisoning targeted machines. For this i will be using “ettercap -qTM arp /10.1.0.100-110// /10.1.0.2//”, but before that, lets dissect what this command does.

  • ettercap – use ettercap
  • q – quite mode, which doesn’t display packet contents
  • T – text mode, which uses text only GUI
  • M – Man in the middle attack
  • arp – what method of attack
  • rest – IP range that is trying to contact the server

Here is the result

lab 11 ettercap.PNG

now that the machines have been poisoned, if we start up wireshark, we should be able to monitor the traffic. Set up the wireshark to search for ARP’s and now if we switch to the WIN10-WS, we should be able to capture some information. firstly we need to connect to the website by entering in the URL (updates.classroom.local), now communication between the WIN10-WS and the web server has started. lets see if KALI captured anything?

lab 11 wireshark.PNG

Exercise Question – What MAC addresses is used on the re transmission packet?

MAC: 00:15:5D:01:4A

lab 11 wireshark mav.PNG

Exercise Three – SSLstrip

SSLstrip is a form of proxy that intercepts any redirection and returns a plain HTTP version of the page. There isn’t much that this exercise explains or needs to be discussed. It just revives both communication from the client and server, however this time in plain HTTP

Exercise Four – Segmentation of Network

Within NMIT, we have the privilege of using vSphere. vSphere in basic terms, is cloud based sandbox for managing virtual machines and because of this, we are not directly following the lab’s outlined by the book. This exercise involves us setting up VLAN’s to segment the network, which with our current set up isn’t possible, as a result, Mark has modified the network layout.

Lab 11 overview.PNG

As seen above, the workstations have been separated away from the servers. servers will be on a 10.1.0/24 and workstations on a 10.20.0/24 network, this is how we will be replicating the “VLAN” effect.

Exercise Question – Mac Address for Network Adapters?

LAN-3106DejaS6 – 00:15:5d:01:ca:32

ISP-3107DejaS6 – 00:15:5d:01:ca:33

I was able to find this within the VM’s adapter settings

now to set up the routers Ethernet interface ports, this virtual router is using VyOS, which i have used in previous classes. So these are the settings i have set up.

lab 11 VyOs interface.PNG

And the services

lab 11 VyOs Services

Before this will work, we need to modify the DHCP scope as currently, the server isn’t giving out on the 10.20.0.0/24 network, only the 10.1.0.0/24. I was able to set up a scope of 10.20.0.100 – 10.20.0.200 under the WIN2016-DC, DHCP settings.

lab 11 new dhcp scope.PNG

Now to test it, if we jump onto the WIN10-WS, via command line, release and renew the ip adress, we should get an ip on the new scope.

lab 11 renew.PNG

this system got 10.20.100/24 and In theory, this will work for the WIN07-WS and KALI systems too.

Exercise Five – Sniffing Gateways

This exercise is a short and easy one. Firstly, we need to update the KALI system onto the new network, by replacing the IPv4 address and default gateway, next we will use ettercap again to send a ARP poisoning attack, but this time on the gateway itself. Activate wire-shark to monitor and switch back over to WIN10-WS.

As we are monitoring traffic going in and out of the gateway, we need to send a request out, so to do this, we can request the LABFILES from the WIN2016-DC server, as this server is on a different network, this will be a good example.

Here are the results from the wireshark.

lab 11 wireshark 2.PNG

This is just a small part of the busy ongoing communication that the wireshark was able to pick up. however we are able to see the WIN10-WS system sending a SMB protocol to the WIN2016-DC system and WIN2016-DC replying.


Lab Ten Journal – Thursday 30 August

Lab Overview

For SEC602, we don’t need to complete lab nine, so I have moved onto number ten. The purpose of Lab ten is learning about different types of account management tools that help with not only active directory, but group policy objects as well.

This lab will be using RT-LAN, WIN2016-DC, WIN2016-MS, WIN10-WS, WIN07-WS and follows the CompTIA Security+ Certification (SYO -501) official guide which includes six exercises for lab ten.

lab 10 overviewe.PNG

Exercise One – Service Accounts

So firstly what are service accounts? well the purpose of a service account is to provide security context for services that are running on the windows server. This means it allows access to both network and local resources. So why is it useful? well from this level, we can see what is using up the servers resources and why. This can be beneficial as an administrator should know what should and what shouldn’t be running on the server. So, to do this, we need to log on to the WIN2016-DC and run a process explorer, which has been given via the labfiles. With this application, it details, the proccess, CPU load, who is using it and by what application.

Exercise Two – Default AD Groups and Users

By default, when setting up Active Directory, it has all sorts of default users. Some that people are familiar with like the standard administrator or guest, however there are a lot more that AD offers. For example, event-log readers, which if the user is part of this group will be allowed to read event logs from their local machine. Another example is remote desktop users, and as the name suggests, if the user is part of this group they have permission to remotely log in to machines. Continuing with the remote desktop users example, if we click on it (right click -> properties or double left click). From here, we can see who are members of this group, what is this group a member of (as groups can be within groups) and lastly who is managing this group.

Exercise Three – Securing Administrators

Why should we need to secure administrators? well administrators are the highest level within users and they have access to everything, so if an administrator account becomes corrupt or stolen, this can be very harmful to the network. Especially if the environment is using the stock standard “administrator” account, this is because every account is given a Security ID and because this is stock, it is the same for every network. This right here can be a breaking point for a network, even if the name was changed, it’s SID cannot be changed.

To fix this, with good networking practice, we should use Organization Units and set up an OU with Administrative rights. By doing this, we are able to assign special users to this OU, Thus having no need for the standard stock users, that can be easily targeted. To create an OU, it is located under the AD’s Users and Groups as shown in exercise two. From here, we are able to create an OU, give it permissions and assign users to it.

Exercise Four – Investigating Group Policies

Now with a small understanding on groups, users and OU’s. We are able to delegate policies to these groups, but what would we do that? Most corruptions or error come from within the workplace itself, from just human error, to stop this is to have high levels of security and work with this in mind:

“If you don’t need it to complete the job, why have access to it”

Example of this, A front desk receptionist does not need access to system settings or security settings of there local machine, but does need access to the printer. So we place them in a group with these policies set up.

A good group policy to look into is making sure users have a good password to protect themselves. So for this example, I have put local and domain administrators into a group policy called “sec-gol-priv”. with this group, we are able to configure a personal password settings for them.

lab 10 password enforcement.PNG

From the image above, we can see that a minimum 12 for password length, it must be changed every 28 days and has a lock out after 3 incorrect attempts.

Exercise Five – Configure Groups and Users

Learning about the dangers of using the administrator account in exercise four, we are going to firstly set up the a user to act as an administrator. so how can that be done? Are we able to add the user itself to the administrator group?

Firstly, we need to sign into the Sam account and under computer management -> local user and groups – > administrators. are we able to add Sam from here?

Exercise Question – Does it work?

No. Which is a good thing as that was way to easy for users to add themselves.

lab 10 access denee.PNG

So we are not able to add a user to administrator by local means. How about adding the server to the computer management console, can we add the user from here?

Exercise Question – Can you access any of the snap-ins?

Nope.

lab 10 snap fail.PNG

So how about via the active directory? To find AD on the windows 10 system. start -> windows administrative tools -> active directory users and computers. From here, we have access to the AdminOU and UsersOU. Now using the AdminOU, are we able to add a user to the administrator group? short answer is no, even after looking via the properties, this account has been set up to not have permission. The rest of this exercise is setting up sale groups for the final exercise, nothing worth noting, just follow the lab.

Exercise Six – Configure File Share

For the final exercise, we will be setting up file sharing and in the previous exercises we set up two type of groups. User who are part of the sales team, who are allowed to edit files and then domain users who are only allowed to read. With this set up, we can create a area of the network were all users can see the current sales records, but only selected can edit. So now to set up the file sharing on the WIN2016-MS.

Log in with Bobby or any other user with administrative permissions (apart from administrator itself). Set up a file under the C: drive with sharing permission of all everyone having full access for now.

Exercise Question – What is the network path(UNC)?

\\Win2016-ms\sales

lab 10 network path.PNG

Now to set up the security permissions. Under the security tab, we are able to set up what users are allowed to do what. Set up the groups that was created earlier to match what they are allowed to do.  Alongside that, we should also set up auditing on this file.


Lab Eight Journal – Wednesday 22 August

Lab Overview

Continuing from last lab, the purpose of this lab is deploying certificates and activating key recovery as if a key becomes lost, that data that has been previously encrypted will be completely cut off and inaccessible. So in this lab, we will be going through restoring keys from archives and other methods

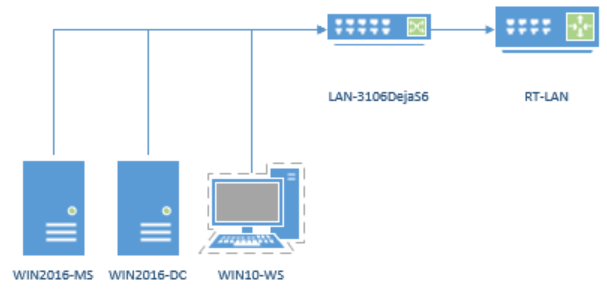
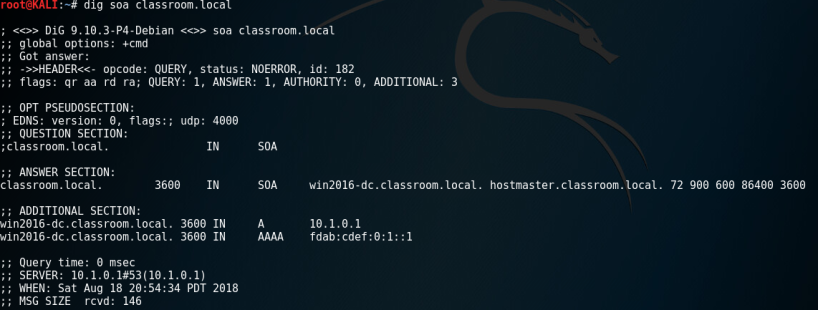
This lab will be using RT-LAN, WIN2016-DC and WIN10-WS and follows the CompTIA Security+ Certification (SYO -501) official guide which includes four exercises for lab eight.

lab 8.PNG

Exercise One – Key Recovery Agent

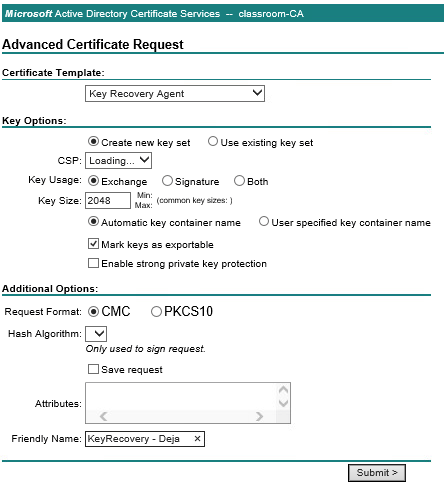
The purpose of key recovering agents is when a key is created, that key is then encrypted by the agents public key and stored, so if whatever reason, the key can then be decrypted with the agents private key. The only issue with this, is that agents can not encrypt old keys that existed before the creation of the agent, so an agent should always be the first thing to be setup. So with a small understanding on what a KRC is, time to start up the WIN2016-DC system to implement it. Creating a new KRC is quite simple. Once the system is running and Certification Authority manager has been opened, all that is needed is to right click -> new template -> KRC. With the template set up, now lets request a certificate.

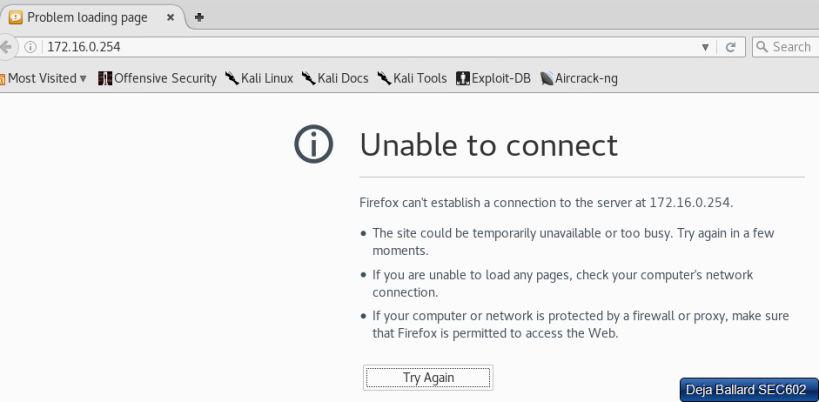
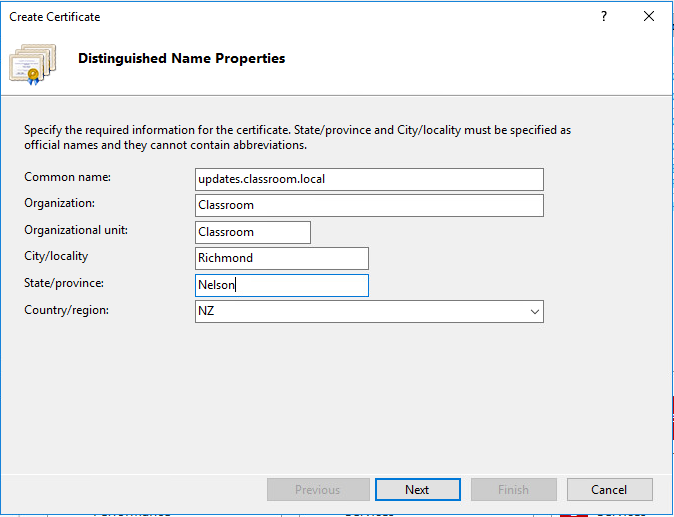
Switching over the the WIN10-WS system, we are able to request a trusted certificate via the https port, while this isn’t a standard way of doing it and shouldn’t be done in real world environment, for a lab it is fine. From here, we are able to locate the certificate server by entering in “WIN2016-DC.classroom.local/certsrv” or “10.1.0.1/certsrv”. however, upon doing this, we are greeted with a page that does not follow the lab.

After further researching, the lab was actually missleading, it states that the student should switch to the WIN10-WS system, however they shouldn’t. So after repeating the “10.1.0.1/certsrv” on the WIN2016-DC system, we get the correct page.

lab 8 request.PNG

As i am currently not following the lab exactly, certain things have been changed.

  • As the server requested the certificate it was instantly issued and became active
  • WIN10-WS does not see any pending certificates as they didn’t request it
  • WIN10-WS has to download new certificate

Now to configure the certificate server with details of the new recovery agent. Staying on WIN2016-DC, with the certificate server manager open. right click on classroom-CA -> properties -> recovery agents. Which ended in another failure, as the certificate was not there, so I decided to see if WIN07-WS could send the certificate request and I fond the issue, the certificate is communicating on HTTP not HTTPS. So i updated the port bindings for the webserver and tried again, using the WIN07-WS.

lab 8 reguest v2.PNG

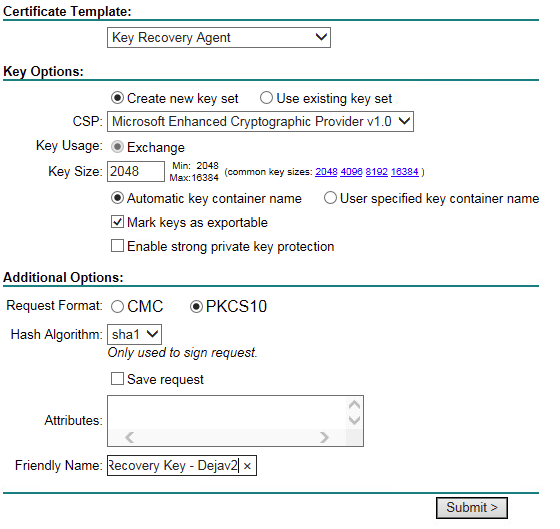
This time it looks more promising as it was able to load both CSP and Hash algorithm, compared to last time.

lab 8 pending.PNG

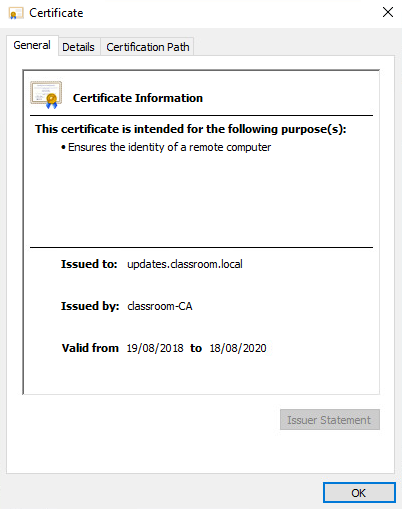
Now I can issue the certificate and install that follows the lab.  Fast forward back to the recovery agent, i am now able to select the Key Recovery Agent, click OK and done!

lab 8 recovery key.PNG

Issues found:

(1) HTTPS port was not set up for the web server that was hosting the certificate server, making it insecure and not allowing certificate requests to be sent

(2) WIN10-WS has some settings set up incorrectly so it is unable to send a request, however WIN07-WS does

Exercise Two – User Certificates

Within a real world environment, a company can have a range from 10 users all the way up to 1,000’s of users, so manually approving each certificate like we did in the last exercise is bad practice, so how can we automatic it, while still making sure only valid users can access them. This can be done through group policies or through certification template list exercise one.

Option One – Auto Enroll via Group Policy Management

Once we have located and opened up the GPO, in this case its “classroom Domain Policy”, navigate to public key policies which is under security settings, from here their is a setting for “auto-enrollment” enable this policy and its done, all future certificate requests will be auto accepted if the user is part of that GPO.

Option Two – Auto Enroll via Certificate Template

Just like exercise one, we are able to create a new template, under the certificate server manager, however in this case we will be just duplicating and existing on. For this example, I will use the user template. From here, we can change all sorts of different components for how the this template will interact, however for this exercise we just need to auto enrollment. Auto enrollment can be found under the security tab, just select the user group and tick auto enroll.

Exercise Three – Encrypting File System

Within windows business editions, we are able to encrypt files by using File Encryption Keys which uses the symmetric key algorithm. Below is a simple diagram of how it works, which was by Soumyasch – Derived from EFS operation scheme.png. Originally by User: Wagner51, CC BY-SA 3.0.

lab 8 EFS.png

For this exercise I will be starting off in the WIN10-WS system and ill be using an example user, called “Sam”. After logging in successfully, I have created example files to be encrypted by EFS. From here i am apply to apply encryption by accessing the advance settings of properties. now the files are highlighted with green text and got a padlock overlay on them

lab 8 encrypted secerts

Exercise Question – What are the certificate thumbprints?

Sam:  CF25 D34B E372 6788 8FAC 3E3E BB00 2D52 B3CD AFC4

Admin:  FED8 C0DF 3005 71D7 44B7 E0A0 0A34 DFC4 18CC 5CBA

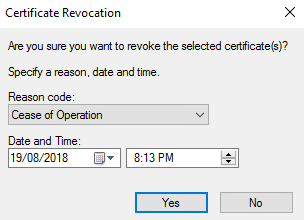
so now what will happen if we delete the private key to access those files? firstly it would be good to back up the private key in a exported file before deletion. We are able to do this via Microsoft’s Management Console. Within this console we able able to locate certificates and from here right click -> export and following the export wizard should successfully export the certificate key that was used to encrypt the files. now we are able to delete the certificate safety. With the certificate gone, I get this result when trying to access the files

lab 8 permission faile.PNG

Exercise Four – Key Recovery

So how can we recovery the key if for some reason the export has been deleted or misplaced. Only users with administrative permissions and access to the server are able to recovery keys.  On the WIN2016-DC we are able to see issued certificates and because of the current set up, once Sam deleted their certificate, they were instantly auto-enrolled with a new one and thus new keys.

lab 8 cert sam issue

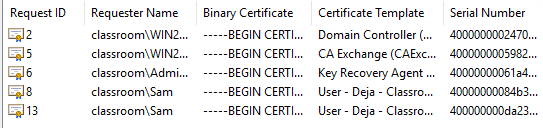
From here, we are able to select the deleted key (Request ID – 8), find the serial number and via command line, request the private key by “certutil – getkey “serialnumber”. request ID -8’s serial number has been highlighted.

lab8 commandline.PNG

From this command, it has exported a blob of information. So now if we switch to the clients system(WIN07-WS) while in administrator, we can recover the key, by using that blob with another certutil command line

lab8 recovered from win7.PNG

Now if we sign in, using sams account, we can view currently using certificates, lets see if using the recover had work. after opening up the certificate console via the MMC, we can see that one certificate is issued to sam, however, as we noted above, this was a new one (requestID-13), not the old one, so the files will still be locked of, so go ahead and delete itlab 8 delete new cert.PNG

This is because while we unloaded it from the blob located in the server under the name “recovered”, we haven’t imported it, so after following the import wizard, the certificate should be reapplied to the account!


Lab Seven Journal – Sunday 19 August

Lab Overview

lab five currently isn’t ready and SEC602 does not cover lab six of the book so i have moved onto lab seven. The purpose of this lab is to learn about the different kinds of digital certificates and use windows to request,issue and revoke certificates, along side basic cryptography concepts. This will be done via the use of public key infrastructure.

This lab will be using RT-LAN, WIN2016-DC, WIN2016-MS and WIN10-WS and follows the CompTIA Security+ Certification (SYO -501) official guide which includes two exercises for lab seven.

Lab 7 overview

Exercise One – Certificate Servers

The certificate server has already been set up by the lab within the WIN2016-DC system. After locating and opening the certificate server,so far their is one certificate called classroom-CA, it has quite a bit of information about it.

  • Is a root certificate
  • issued to and by itself
  • valid from 31/07/2018 till 31/07/2023
  • version 4
  • Using SHA-256 to encrypt
  • Uses RSA to dencrypt
  • Common name = classroom-CA
  • Domain Components = classroom, local
  • Usage
    • Digital Signature
    • Certificate Signing
    • Off-line CRL Signing*
    • CRL Signing*

*CRL is short for Certificate Revocation list, which is simply a list of certificates that have been revoked by either being expired or no longer a trusted certificate.

Along side this information, this certificate has issued a child  domain controller certificate named “WIN2016-DC.classroom.local”. This certificate is only valid from 31/07/2018 till 31/07/2019. The purpose of this certificate is to provide and ensures a valid identity for remote computers.

Exercise Two – Requesting Certificates

With a basic understanding of navigation and why certifications are needed. we can now request my own one. To do this, i have moved to the other server (WIN2016-MS) and opened up the server certificates under the IIS manager. From here, we are able to create a request for a certificate and for this example, ill create a domain certificate.

lab 7 certificate prop.PNG

After this screen, I have to enter an existing certification will authority and in this case, it is the root certificate (classroom-CA).

By having this certificate, the mail server is able use that certificate to create secure server based tools, like binding HTTPS to being secure. This is done by editing the server’s sites and adding this certificate when adding or editing ports.

Now that a HTTPS site has been set up and trusted via the certificate. if we move back to the WIN2016-DC system, the new certificate should of shown up and also the HTTPS site should be searchable.

lab7 web cert.PNG

lab 7 web.PNG

Everything returned positive, so now to remove the certificate. This can be done via the server with the root certificate so WIN2016-DC. This is very easy to accomplish, all that is needed is to find the targeted certificate under issued certificates and right click -> all tasks -> revoke certificate. done!

lab 7 revoke.PNG


Lab Four Journal – Sunday 19 August

Lab Overview

The purpose of this lab, is all about learning to use a variety of tools to probe hosts on a local network. Probing is simply an action taken to learn about the state of the network or host, however this can be used for white hat monitoring all the way up to black hat full control access and host files.

For this lab I will be using RT-LAN, WIN2016-DC, WIN2016-MS,KALI and WIN07-WS. This lab follows the CompTIA Security+ Certification (SYO -501) official guide which includes four exercises for lab four.

Lab 4 Overview.PNG

Exercise One – Local Subnet Scanning

this scan will be run via the Kali machine, so firstly we need to make sure everything is connected correctly and DHCP is working. After connecting the Kali up to the DHCP server, it has been given an IP of 10.1.0.102/24 on the 10.1.0.1/24 DNS server. Once that has been set up, i ran a ARP command, to see if any other hosts are on this subnet. ARP is short for Address Resolution Protocol, which is a communication protocol that is used for finding MAC addresses within the subnet. At first it returned only with 10.1.0.1, which is the server and nothing else. This is because the Kali system hasn’t made contact with any other systems yet, apart from asking for a IP addresses from the DHCP server. So i decided to ping the windows 7 system (10.1.0.100) and after that, it was added to the ARP list.

A more modern way of doing this, instead of pinging systems, is to use netdiscover which scans a subnet for any activity. for this, I selected the network device i want to send the scan out of, which in this can was eth0 (ethernet) and what range i would like to use and this was 10.1.0.0/24 as this is the subnet the lab is working on. This was the result. it was able to find the other server (10.1.0.2) and the LAN router (10.1.0.254).Lab 4 netdiscover.PNG

Exercise Two – Host Scanning

Now that i have been able to find the IP addresses of the hosts on the network, I can now focus my scanning to an individual to find more about that host.

Exercise Question – What will the output of “nmap -sS 10.1.0.254” be?

First thing i notice is that this command will be scanning the LAN router.  Nmap most likely means Network Map, so it is will map the routers network and via the use of nmap -h, It tells me -sS is a canning technique, that uses TCP to scan and map out the network.

lab 4 NMap.PNG

The result shows me what ports the targeted has open and their mac address. This tells me that the SSH (Secure Shell) port 22 is open, which is used to be able to remote login to the system. Now for a more indepth scan, with the use of nmap -A, which enables OS, version detection, script scanning and traceroutes. This is the result

lab 4 nmap -a.PNG

This was able to identify more about the SSH port, by finding the host key which is used to identify the host and encrypt the communication. It was also able to identify the OS system, which is a Linux as this router is running VyOS.

Exercise Three – DNS Harvesting

So far i have scanned the subnet, scanned an individual host, now its time to scan the DNS, to find any vulnerabilities. As this is a scenario, we technically don’t know the DNS yet, so we can do a reverse lookup  which can be used to tell us what the DNS is.  after doing a reverse look up on the target (dig -x 10.1.0.254), i wasn’t able to find the DNS, however i was able to located the servers address, which is 10.1.0.1.

After pinging 10.1.0.1, it doesn’t give any new information, so how about ping the kali system itself. by doing that, I was able to find “.classroom.local” (127.0.1.1). so after doing a  look up of the classroom.local, i was able to gather this.

lab 4 dig classroom.PNG

From this, i am able to note the classroom.local’s system name and also that this server’s IP address is 10.1.0.1. Now to dig into the DNS even further by adding AXFR to the dig command, which is a query for DNS zone transfering. Im unsure about, why this is useful for DNS harvesting, however this is the result it gave.

lab 4 dig AXFR.PNG

Exercise Question – What are key facts you can learn from the AXFR response?

There is a lot to process with this response. The first thing i noticed, is at the bottom, it was able to gather information about the other systems. It tells me that WIN2016-MS is a mail server and what its MAC address. Having a quick scan through the middle section, it describes what protocols, ports, zones and other information about how the DNS was built.

Exercise Four – Zenmap

The purpose of zenmap, is that it enables a graphical user interface to the Nmap commands, so users don’t have to use the terminal and is easier to view information. zenmap offers a lot more information to the user compared to the standard nmap commands. after running a nmap scan of the network, it gave a lot more information. it included a scan of all active host ports and OS detection. Lastly it wrote up a typology graphic.

lab 4 legendlab 4 typo

Along side a typology graph, it also describes what each port is being used for, compared to the nmap which just said which port was open. After viewing the 10.1.0.1 host, it has HTTP and DNS enabled. so this must be the DNS server. 10.1.0.2 has all ports for a mail server enabled and the last three just have standard build ports for that system to run enabled.

Reflection On Lab Four

Zenmap gave the easiest and fastest results compared to all other methods, however it was useful to learn how those commands work and how they can be used. I prefer these types of labs as they give a lot of information to research and learn outside of the lab. Also it is helping me learn more and more about Linux systems